* 내가 읽으려고 내 맘대로 번역한 글.
* 원문 : https://docs.swift.org/swift-book/LanguageGuide/ControlFlow.html
Control Flow
Swift provides a variety of control flow statements. These include while loops to perform a task multiple times; if, guard, and switch statements to execute different branches of code based on certain conditions; and statements such as break and continue to transfer the flow of execution to another point in your code.
Swift also provides a for-in loop that makes it easy to iterate over arrays, dictionaries, ranges, strings, and other sequences.
swift는 다양한 흐름제어 구문을 제공한다.
while 반복문.
if, guard, swith 조건문.
for-in 반복문은 Array, Dictionary, Range, String 등을 반복하기 쉽게 해준다.
Swift’s switch statement is considerably more powerful than its counterpart in many C-like languages. Cases can match many different patterns, including interval matches, tuples, and casts to a specific type. Matched values in a switch case can be bound to temporary constants or variables for use within the case’s body, and complex matching conditions can be expressed with a where clause for each case.
swift의 switch 구문은 c기반의 언어들보다 강력하다.
case 는 여러 다른 패턴과 매칭시킬수 있고, tuple도 매칭시킬수 있고, 띄엄띄엄 있는 값들과도 매칭시킬수 있고, 특정타입으로 변환할수도 있다. 매칭된 값은 임시 상수나 변수에 연결해서 case 문 안에서 사용할수도 있고, 복잡한 매칭 조건은 각 case 문 안에서 where 조건으로 표현할수 있다.
For-In Loops
You use the for-in loop to iterate over a sequence, such as items in an array, ranges of numbers, or characters in a string.
This example uses a for-in loop to iterate over the items in an array:
배열의 각 항목, 범위의 숫자, 문자열의 각 글자 등과 같은 곳에 for-in 반복문을 사용할수 있다.
let names = ["Anna", "Alex", "Brian", "Jack"]
for name in names {
	print("Hello, \(name)!")
}
// Hello, Anna!
// Hello, Alex!
// Hello, Brian!
// Hello, Jack!
You can also iterate over a dictionary to access its key-value pairs. Each item in the dictionary is returned as a (key, value) tuple when the dictionary is iterated, and you can decompose the (key, value) tuple’s members as explicitly named constants for use within the body of the for-in loop. In the code example below, the dictionary’s keys are decomposed into a constant called animalName, and the dictionary’s values are decomposed into a constant called legCount.
Dictionary의 key-value 쌍을 반복문에 사용할수 있다.
for-in 반복문 안에서 Dictionay의 각 항목은 (key, value) 형태의 tuple을 리턴하고, key와 value에 너가 할당한 이름으로 사용가능함.
아래 예제에서 Dictionary의 key는 animalName 이라는 상수에 할당되고, value는 legCount라는 상수에 할당된다.
let numberOfLegs = ["spider": 8, "ant": 6, "cat": 4]
for (animalName, legCount) in numberOfLegs {
	print("\(animalName)s have \(legCount) legs")
}
// cats have 4 legs
// ants have 6 legs
// spiders have 8 legs
The contents of a Dictionary are inherently unordered, and iterating over them does not guarantee the order in which they will be retrieved. In particular, the order you insert items into a Dictionary doesn’t define the order they are iterated. For more about arrays and dictionaries, see Collection Types.
Dictionary에 포함된 항목들은 순서가 없으니까, 반복문에서 꺼내올때마다 순서가 달라질수 있다.
특히 Dictionary에 추가된 항목의 순서는 꺼낼때 아무 상관없다.
You can also use for-in loops with numeric ranges. This example prints the first few entries in a five-times table:
for index in 1...5 {
	print("\(index) times 5 is \(index * 5)")
}
// 1 times 5 is 5
// 2 times 5 is 10
// 3 times 5 is 15
// 4 times 5 is 20
// 5 times 5 is 25
The sequence being iterated over is a range of numbers from 1 to 5, inclusive, as indicated by the use of the closed range operator (...). The value of index is set to the first number in the range (1), and the statements inside the loop are executed. In this case, the loop contains only one statement, which prints an entry from the five-times table for the current value of index. After the statement is executed, the value of index is updated to contain the second value in the range (2), and the print(_:separator:terminator:) function is called again. This process continues until the end of the range is reached.
In the example above, index is a constant whose value is automatically set at the start of each iteration of the loop. As such, index does not have to be declared before it is used. It is implicitly declared simply by its inclusion in the loop declaration, without the need for a let declaration keyword.
위의 예에서 index는 자동으로 값이 설정되는 상수기 때문에 따로 선언할 필요 없다.
If you don’t need each value from a sequence, you can ignore the values by using an underscore in place of a variable name.
너가 각 반복에서 값이 필요없다면, 상수 자리에 underscore (__)를 넣어서 무시할수 있다.
let base = 3
let power = 10
var answer = 1
for _ in 1...power {
	answer *= base
}
print("\(base) to the power of \(power) is \(answer)")
// Prints "3 to the power of 10 is 59049"
The example above calculates the value of one number to the power of another (in this case, 3 to the power of 10). It multiplies a starting value of 1 (that is, 3 to the power of 0) by 3, ten times, using a closed range that starts with 1 and ends with 10. For this calculation, the individual counter values each time through the loop are unnecessary—the code simply executes the loop the correct number of times. The underscore character (_) used in place of a loop variable causes the individual values to be ignored and does not provide access to the current value during each iteration of the loop.
In some situations, you might not want to use closed ranges, which include both endpoints. Consider drawing the tick marks for every minute on a watch face. You want to draw 60 tick marks, starting with the 0 minute. Use the half-open range operator (..<) to include the lower bound but not the upper bound. For more about ranges, see Range Operators.
- let minutes = 60
- for tickMark in 0..<minutes {
- // render the tick mark each minute (60 times)
- }
Some users might want fewer tick marks in their UI. They could prefer one mark every 5minutes instead. Use the stride(from:to:by:) function to skip the unwanted marks.
- let minuteInterval = 5
- for tickMark in stride(from: 0, to: minutes, by: minuteInterval) {
- // render the tick mark every 5 minutes (0, 5, 10, 15 ... 45, 50, 55)
- }
Closed ranges are also available, by using stride(from:through:by:) instead:
- let hours = 12
- let hourInterval = 3
- for tickMark in stride(from: 3, through: hours, by: hourInterval) {
- // render the tick mark every 3 hours (3, 6, 9, 12)
- }
While Loops
A while loop performs a set of statements until a condition becomes false. These kinds of loops are best used when the number of iterations is not known before the first iteration begins. Swift provides two kinds of while loops:
while 반복문은 조건이 false가 될때까지 수행된다.
반복횟수를 미리 알수 없는 경우에 사용하면 좋다.
swift는 2가지 종류의 while 문을 제공한다.
- while evaluates its condition at the start of each pass through the loop.
- repeat-while evaluates its condition at the end of each pass through the loop.
- 매 반복시 조건을 먼저 검사하는 while.
- 매 반복시 먼저 실행한후 조건을 검사하는 repeat-while.
While
A while loop starts by evaluating a single condition. If the condition is true, a set of statements is repeated until the condition becomes false.
Here’s the general form of a while loop:
while 반복문은 조건을 검사한후 시작된다. 만약 조건이 참이면 while문에 포함된 구문들이 반복되고, 조건이 false이면 멈춘다.
- while condition {
- statements
- }
This example plays a simple game of Snakes and Ladders (also known as Chutes and Ladders):
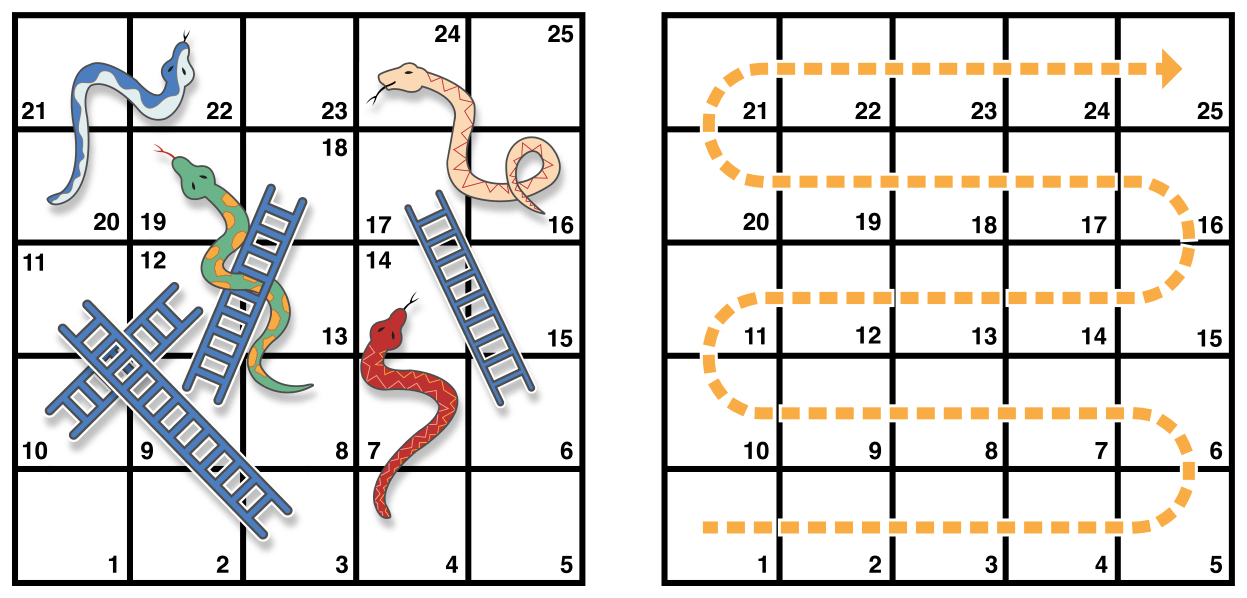
The rules of the game are as follows:
- The board has 25 squares, and the aim is to land on or beyond square 25.
- The player’s starting square is “square zero”, which is just off the bottom-left corner of the board.
- Each turn, you roll a six-sided dice and move by that number of squares, following the horizontal path indicated by the dotted arrow above.
- If your turn ends at the bottom of a ladder, you move up that ladder.
- If your turn ends at the head of a snake, you move down that snake.
The game board is represented by an array of Int values. Its size is based on a constant called finalSquare, which is used to initialize the array and also to check for a win condition later in the example. Because the players start off the board, on “square zero”, the board is initialized with 26 zero Int values, not 25.
- let finalSquare = 25
- var board = [Int](repeating: 0, count: finalSquare + 1)
Some squares are then set to have more specific values for the snakes and ladders. Squares with a ladder base have a positive number to move you up the board, whereas squares with a snake head have a negative number to move you back down the board.
- board[03] = +08; board[06] = +11; board[09] = +09; board[10] = +02
- board[14] = -10; board[19] = -11; board[22] = -02; board[24] = -08
Square 3 contains the bottom of a ladder that moves you up to square 11. To represent this, board[03] is equal to +08, which is equivalent to an integer value of 8 (the difference between 3 and 11). To align the values and statements, the unary plus operator (+i) is explicitly used with the unary minus operator (-i) and numbers lower than 10 are padded with zeros. (Neither stylistic technique is strictly necessary, but they lead to neater code.)
- var square = 0
- var diceRoll = 0
- while square < finalSquare {
- // roll the dice
- diceRoll += 1
- if diceRoll == 7 { diceRoll = 1 }
- // move by the rolled amount
- square += diceRoll
- if square < board.count {
- // if we're still on the board, move up or down for a snake or a ladder
- square += board[square]
- }
- }
- print("Game over!")
The example above uses a very simple approach to dice rolling. Instead of generating a random number, it starts with a diceRoll value of 0. Each time through the while loop, diceRoll is incremented by one and is then checked to see whether it has become too large. Whenever this return value equals 7, the dice roll has become too large and is reset to a value of 1. The result is a sequence of diceRoll values that is always 1, 2, 3, 4, 5, 6, 1, 2and so on.
After rolling the dice, the player moves forward by diceRoll squares. It’s possible that the dice roll may have moved the player beyond square 25, in which case the game is over. To cope with this scenario, the code checks that square is less than the board array’s countproperty. If square is valid, the value stored in board[square] is added to the current square value to move the player up or down any ladders or snakes.
NOTE
If this check is not performed, board[square] might try to access a value outside the bounds of the board array, which would trigger a runtime error.
The current while loop execution then ends, and the loop’s condition is checked to see if the loop should be executed again. If the player has moved on or beyond square number 25, the loop’s condition evaluates to false and the game ends.
A while loop is appropriate in this case, because the length of the game is not clear at the start of the while loop. Instead, the loop is executed until a particular condition is satisfied.
Repeat-While
The other variation of the while loop, known as the repeat-while loop, performs a single pass through the loop block first, before considering the loop’s condition. It then continues to repeat the loop until the condition is false.
repeat-while 먼저 구문들을 실행한후에 조건을 검사한다. 조건이 false가 될때까지 반복된다.
NOTE
The repeat-while loop in Swift is analogous to a do-while loop in other languages.
repeat-while 문은 다른 언어들의 do-while 문과 비슷하다.
Here’s the general form of a repeat-while loop:
- repeat {
- statements
- } while condition
Here’s the Snakes and Ladders example again, written as a repeat-while loop rather than a while loop. The values of finalSquare, board, square, and diceRoll are initialized in exactly the same way as with a while loop.
- let finalSquare = 25
- var board = [Int](repeating: 0, count: finalSquare + 1)
- board[03] = +08; board[06] = +11; board[09] = +09; board[10] = +02
- board[14] = -10; board[19] = -11; board[22] = -02; board[24] = -08
- var square = 0
- var diceRoll = 0
In this version of the game, the first action in the loop is to check for a ladder or a snake. No ladder on the board takes the player straight to square 25, and so it isn’t possible to win the game by moving up a ladder. Therefore, it’s safe to check for a snake or a ladder as the first action in the loop.
At the start of the game, the player is on “square zero”. board[0] always equals 0 and has no effect.
- repeat {
- // move up or down for a snake or ladder
- square += board[square]
- // roll the dice
- diceRoll += 1
- if diceRoll == 7 { diceRoll = 1 }
- // move by the rolled amount
- square += diceRoll
- } while square < finalSquare
- print("Game over!")
After the code checks for snakes and ladders, the dice is rolled and the player is moved forward by diceRoll squares. The current loop execution then ends.
The loop’s condition (while square < finalSquare) is the same as before, but this time it’s not evaluated until the end of the first run through the loop. The structure of the repeat-while loop is better suited to this game than the while loop in the previous example. In the repeat-while loop above, square += board[square] is always executed immediately after the loop’s while condition confirms that square is still on the board. This behavior removes the need for the array bounds check seen in the while loop version of the game described earlier.
Conditional Statements
It is often useful to execute different pieces of code based on certain conditions. You might want to run an extra piece of code when an error occurs, or to display a message when a value becomes too high or too low. To do this, you make parts of your code conditional.
특정 조건에 따라 다른 구문을 실행할 필요가 있다. 또한 에러 발생시 특정한 구문을 실행할 필요도 있다.
그때 조건문을 쓴다.
Swift provides two ways to add conditional branches to your code: the if statement and the switch statement. Typically, you use the if statement to evaluate simple conditions with only a few possible outcomes. The switch statement is better suited to more complex conditions with multiple possible permutations and is useful in situations where pattern matching can help select an appropriate code branch to execute.
swift에서는 2가지 종류의 조건문이 있다. if, switch.
일반적으로 if 문을 사용하여 간단한 조건을 검사한다.
switch 좀 더 복잡한 조건에 적합하다.
If
In its simplest form, the if statement has a single if condition. It executes a set of statements only if that condition is true.
var temperatureInFahrenheit = 30
if temperatureInFahrenheit <= 32 {
	print("It's very cold. Consider wearing a scarf.")
}
// Prints "It's very cold. Consider wearing a scarf."
The example above checks whether the temperature is less than or equal to 32 degrees Fahrenheit (the freezing point of water). If it is, a message is printed. Otherwise, no message is printed, and code execution continues after the if statement’s closing brace.
The if statement can provide an alternative set of statements, known as an else clause, for situations when the if condition is false. These statements are indicated by the elsekeyword.
temperatureInFahrenheit = 40
if temperatureInFahrenheit <= 32 {
	print("It's very cold. Consider wearing a scarf.")
} else {
	print("It's not that cold. Wear a t-shirt.")
}
// Prints "It's not that cold. Wear a t-shirt."
One of these two branches is always executed. Because the temperature has increased to 40 degrees Fahrenheit, it is no longer cold enough to advise wearing a scarf and so the elsebranch is triggered instead.
You can chain multiple if statements together to consider additional clauses.
temperatureInFahrenheit = 90
if temperatureInFahrenheit <= 32 {
	print("It's very cold. Consider wearing a scarf.")
} else if temperatureInFahrenheit >= 86 {
	print("It's really warm. Don't forget to wear sunscreen.")
} else {
	print("It's not that cold. Wear a t-shirt.")
}
// Prints "It's really warm. Don't forget to wear sunscreen."
Here, an additional if statement was added to respond to particularly warm temperatures. The final else clause remains, and it prints a response for any temperatures that are neither too warm nor too cold.
The final else clause is optional, however, and can be excluded if the set of conditions does not need to be complete.
temperatureInFahrenheit = 72
if temperatureInFahrenheit <= 32 {
	print("It's very cold. Consider wearing a scarf.")
} else if temperatureInFahrenheit >= 86 {
	print("It's really warm. Don't forget to wear sunscreen.")
}
Because the temperature is neither too cold nor too warm to trigger the if or else ifconditions, no message is printed.
Switch
A switch statement considers a value and compares it against several possible matching patterns. It then executes an appropriate block of code, based on the first pattern that matches successfully. A switch statement provides an alternative to the if statement for responding to multiple potential states.
In its simplest form, a switch statement compares a value against one or more values of the same type.
- switch some value to consider {
- case value 1:
- respond to value 1
- case value 2,
- value 3:
- respond to value 2 or 3
- default:
- otherwise, do something else
- }
Every switch statement consists of multiple possible cases, each of which begins with the case keyword. In addition to comparing against specific values, Swift provides several ways for each case to specify more complex matching patterns. These options are described later in this chapter.
Like the body of an if statement, each case is a separate branch of code execution. The switch statement determines which branch should be selected. This procedure is known as switching on the value that is being considered.
Every switch statement must be exhaustive. That is, every possible value of the type being considered must be matched by one of the switch cases. If it’s not appropriate to provide a case for every possible value, you can define a default case to cover any values that are not addressed explicitly. This default case is indicated by the default keyword, and must always appear last.
This example uses a switch statement to consider a single lowercase character called someCharacter:
let someCharacter: Character = "z"
switch someCharacter {
	case "a":
		print("The first letter of the alphabet")
	case "z":
		print("The last letter of the alphabet")
	default:
		print("Some other character")
}
// Prints "The last letter of the alphabet"
The switch statement’s first case matches the first letter of the English alphabet, a, and its second case matches the last letter, z. Because the switch must have a case for every possible character, not just every alphabetic character, this switch statement uses a default case to match all characters other than a and z. This provision ensures that the switch statement is exhaustive.
No Implicit Fallthrough
In contrast with switch statements in C and Objective-C, switch statements in Swift do not fall through the bottom of each case and into the next one by default. Instead, the entire switch statement finishes its execution as soon as the first matching switch case is completed, without requiring an explicit break statement. This makes the switch statement safer and easier to use than the one in C and avoids executing more than one switch case by mistake.
NOTE
Although break is not required in Swift, you can use a break statement to match and ignore a particular case or to break out of a matched case before that case has completed its execution. For details, see Break in a Switch Statement.
The body of each case must contain at least one executable statement. It is not valid to write the following code, because the first case is empty:
let anotherCharacter: Character = "a"
switch anotherCharacter {
	case "a": // Invalid, the case has an empty body
	case "A":
		print("The letter A")
	default:
		print("Not the letter A")
}
// This will report a compile-time error.
Unlike a switch statement in C, this switch statement does not match both "a" and "A". Rather, it reports a compile-time error that case "a": does not contain any executable statements. This approach avoids accidental fallthrough from one case to another and makes for safer code that is clearer in its intent.
To make a switch with a single case that matches both "a" and "A", combine the two values into a compound case, separating the values with commas.
let anotherCharacter: Character = "a"
switch anotherCharacter {
	case "a", "A":
		print("The letter A")
	default:
		print("Not the letter A")
}
// Prints "The letter A"
For readability, a compound case can also be written over multiple lines. For more information about compound cases, see Compound Cases.
NOTE
To explicitly fall through at the end of a particular switch case, use the fallthrough keyword, as described in Fallthrough.
Interval Matching
Values in switch cases can be checked for their inclusion in an interval. This example uses number intervals to provide a natural-language count for numbers of any size:
let approximateCount = 62
let countedThings = "moons orbiting Saturn"
let naturalCount: String
switch approximateCount {
	case 0:
		naturalCount = "no"
	case 1..<5:
		naturalCount = "a few"
	case 5..<12:
		naturalCount = "several"
	case 12..<100:
		naturalCount = "dozens of"
	case 100..<1000:
		naturalCount = "hundreds of"
	default:
		naturalCount = "many"
}
print("There are \(naturalCount) \(countedThings).")
// Prints "There are dozens of moons orbiting Saturn."
In the above example, approximateCount is evaluated in a switch statement. Each casecompares that value to a number or interval. Because the value of approximateCount falls between 12 and 100, naturalCount is assigned the value "dozens of", and execution is transferred out of the switch statement.
Tuples
You can use tuples to test multiple values in the same switch statement. Each element of the tuple can be tested against a different value or interval of values. Alternatively, use the underscore character (_), also known as the wildcard pattern, to match any possible value.
The example below takes an (x, y) point, expressed as a simple tuple of type (Int, Int), and categorizes it on the graph that follows the example.
let somePoint = (1, 1)
switch somePoint {
	case (0, 0):
		print("\(somePoint) is at the origin")
	case (_, 0):
		print("\(somePoint) is on the x-axis")
	case (0, _):
		print("\(somePoint) is on the y-axis")
	case (-2...2, -2...2):
		print("\(somePoint) is inside the box")
	default:
		print("\(somePoint) is outside of the box")
}
// Prints "(1, 1) is inside the box"
The switch statement determines whether the point is at the origin (0, 0), on the red x-axis, on the orange y-axis, inside the blue 4-by-4 box centered on the origin, or outside of the box.
Unlike C, Swift allows multiple switch cases to consider the same value or values. In fact, the point (0, 0) could match all four of the cases in this example. However, if multiple matches are possible, the first matching case is always used. The point (0, 0) would match case (0, 0) first, and so all other matching cases would be ignored.
Value Bindings
A switch case can name the value or values it matches to temporary constants or variables, for use in the body of the case. This behavior is known as value binding, because the values are bound to temporary constants or variables within the case’s body.
The example below takes an (x, y) point, expressed as a tuple of type (Int, Int), and categorizes it on the graph that follows:
let anotherPoint = (2, 0)
switch anotherPoint {
	case (let x, 0):
		print("on the x-axis with an x value of \(x)")
	case (0, let y):
		print("on the y-axis with a y value of \(y)")
	case let (x, y):
		print("somewhere else at (\(x), \(y))")
}
// Prints "on the x-axis with an x value of 2"
The switch statement determines whether the point is on the red x-axis, on the orange y-axis, or elsewhere (on neither axis).
The three switch cases declare placeholder constants x and y, which temporarily take on one or both tuple values from anotherPoint. The first case, case (let x, 0), matches any point with a y value of 0 and assigns the point’s x value to the temporary constant x. Similarly, the second case, case (0, let y), matches any point with an x value of 0 and assigns the point’s y value to the temporary constant y.
After the temporary constants are declared, they can be used within the case’s code block. Here, they are used to print the categorization of the point.
This switch statement does not have a default case. The final case, case let (x, y), declares a tuple of two placeholder constants that can match any value. Because anotherPoint is always a tuple of two values, this case matches all possible remaining values, and a default case is not needed to make the switch statement exhaustive.
Where
A switch case can use a where clause to check for additional conditions.
The example below categorizes an (x, y) point on the following graph:
let yetAnotherPoint = (1, -1)
switch yetAnotherPoint {
	case let (x, y) where x == y:
		print("(\(x), \(y)) is on the line x == y")
	case let (x, y) where x == -y:
		print("(\(x), \(y)) is on the line x == -y")
	case let (x, y):
		print("(\(x), \(y)) is just some arbitrary point")
}
// Prints "(1, -1) is on the line x == -y"
The switch statement determines whether the point is on the green diagonal line where x == y, on the purple diagonal line where x == -y, or neither.
The three switch cases declare placeholder constants x and y, which temporarily take on the two tuple values from yetAnotherPoint. These constants are used as part of a whereclause, to create a dynamic filter. The switch case matches the current value of point only if the where clause’s condition evaluates to true for that value.
As in the previous example, the final case matches all possible remaining values, and so a default case is not needed to make the switch statement exhaustive.
Compound Cases
Multiple switch cases that share the same body can be combined by writing several patterns after case, with a comma between each of the patterns. If any of the patterns match, then the case is considered to match. The patterns can be written over multiple lines if the list is long. For example:
let someCharacter: Character = "e"
switch someCharacter {
	case "a", "e", "i", "o", "u":
		print("\(someCharacter) is a vowel")
	case "b", "c", "d", "f", "g", "h", "j", "k", "l", "m", "n", "p", "q", "r", "s", "t", "v", "w", "x", "y", "z":
		print("\(someCharacter) is a consonant")
	default:
		print("\(someCharacter) is not a vowel or a consonant")
}
// Prints "e is a vowel"
The switch statement’s first case matches all five lowercase vowels in the English language. Similarly, its second case matches all lowercase English consonants. Finally, the defaultcase matches any other character.
Compound cases can also include value bindings. All of the patterns of a compound case have to include the same set of value bindings, and each binding has to get a value of the same type from all of the patterns in the compound case. This ensures that, no matter which part of the compound case matched, the code in the body of the case can always access a value for the bindings and that the value always has the same type.
let stillAnotherPoint = (9, 0)
switch stillAnotherPoint {
	case (let distance, 0), (0, let distance):
		print("On an axis, \(distance) from the origin")
	default:
		print("Not on an axis")
}
// Prints "On an axis, 9 from the origin"
The case above has two patterns: (let distance, 0) matches points on the x-axis and (0, let distance) matches points on the y-axis. Both patterns include a binding for distance and distance is an integer in both patterns—which means that the code in the body of the case can always access a value for distance.
Control Transfer Statements
Control transfer statements change the order in which your code is executed, by transferring control from one piece of code to another. Swift has five control transfer statements:
아래의 구문들은 코드들의 실행순서를 변경한다.
- continue
- break
- fallthrough
- return
- throw
The continue, break, and fallthrough statements are described below. The return statement is described in Functions, and the throw statement is described in Propagating Errors Using Throwing Functions.
continue, break, fallthrough 는 아래에서 설명하고, return, throw 는 나중에 설명한다.
Continue
The continue statement tells a loop to stop what it is doing and start again at the beginning of the next iteration through the loop. It says “I am done with the current loop iteration” without leaving the loop altogether.
The following example removes all vowels and spaces from a lowercase string to create a cryptic puzzle phrase:
continue는 현재 작업을 중지하고 다음 반복의 처음부분을 다시 시작한다.
let puzzleInput = "great minds think alike"
var puzzleOutput = ""
let charactersToRemove: [Character] = ["a", "e", "i", "o", "u", " "]
for character in puzzleInput {
	if charactersToRemove.contains(character) {
		continue
	}
	puzzleOutput.append(character)
}
print(puzzleOutput)
// Prints "grtmndsthnklk"
The code above calls the continue keyword whenever it matches a vowel or a space, causing the current iteration of the loop to end immediately and to jump straight to the start of the next iteration.
위의 예제는 puzzleInput의 문자들을 반복하다가, 문자가 모음 또는 스페이스면 다음 문자을 실행하지 않고 for-in 문의 다음 반복으로 이동한다.
Break
The break statement ends execution of an entire control flow statement immediately. The break statement can be used inside a switch or loop statement when you want to terminate the execution of the switch or loop statement earlier than would otherwise be the case.
break문은 전체 흐름을 중지한다. switch 나 반복문 안에서 즉시 빠져나오길 원할때 사용한다.
Break in a Loop Statement
When used inside a loop statement, break ends the loop’s execution immediately and transfers control to the code after the loop’s closing brace (}). No further code from the current iteration of the loop is executed, and no further iterations of the loop are started.
반복문안에서 break는 즉시 그 반복문을 빠져나오게 한다.
Break in a Switch Statement
When used inside a switch statement, break causes the switch statement to end its execution immediately and to transfer control to the code after the switch statement’s closing brace (}).
switch안에서 break는 즉시 그 switch구문을 빠져나오게 한다.
This behavior can be used to match and ignore one or more cases in a switch statement. Because Swift’s switch statement is exhaustive and does not allow empty cases, it is sometimes necessary to deliberately match and ignore a case in order to make your intentions explicit. You do this by writing the break statement as the entire body of the case you want to ignore. When that case is matched by the switch statement, the breakstatement inside the case ends the switch statement’s execution immediately.
NOTE
A switch case that contains only a comment is reported as a compile-time error. Comments are not statements and do not cause a switch case to be ignored. Always use a break statement to ignore a switch case.
The following example switches on a Character value and determines whether it represents a number symbol in one of four languages. For brevity, multiple values are covered in a single switch case.
let numberSymbol: Character = "三" // Chinese symbol for the number 3
var possibleIntegerValue: Int?
switch numberSymbol {
	case "1", "١", "一", "๑":
		possibleIntegerValue = 1
	case "2", "٢", "二", "๒":
		possibleIntegerValue = 2
	case "3", "٣", "三", "๓":
		possibleIntegerValue = 3
	case "4", "٤", "四", "๔":
		possibleIntegerValue = 4
	default:
break
}
if let integerValue = possibleIntegerValue {
	print("The integer value of \(numberSymbol) is \(integerValue).")
} else {
	print("An integer value could not be found for \(numberSymbol).")
}
// Prints "The integer value of 三 is 3."
This example checks numberSymbol to determine whether it is a Latin, Arabic, Chinese, or Thai symbol for the numbers 1 to 4. If a match is found, one of the switch statement’s cases sets an optional Int? variable called possibleIntegerValue to an appropriate integer value.
After the switch statement completes its execution, the example uses optional binding to determine whether a value was found. The possibleIntegerValue variable has an implicit initial value of nil by virtue of being an optional type, and so the optional binding will succeed only if possibleIntegerValue was set to an actual value by one of the switchstatement’s first four cases.
Because it’s not practical to list every possible Character value in the example above, a default case handles any characters that are not matched. This default case does not need to perform any action, and so it is written with a single break statement as its body. As soon as the default case is matched, the break statement ends the switch statement’s execution, and code execution continues from the if let statement.
Fallthrough
In Swift, switch statements don’t fall through the bottom of each case and into the next one. That is, the entire switch statement completes its execution as soon as the first matching case is completed. By contrast, C requires you to insert an explicit break statement at the end of every switch case to prevent fallthrough. Avoiding default fallthrough means that Swift switch statements are much more concise and predictable than their counterparts in C, and thus they avoid executing multiple switch cases by mistake.
swift에서 switch문은 조건이 맞는 첫 case 문이 끝나면 바로 switch 문 밖으로 나간다.
반면에 c 언어는 각 case문 마다 반드시 break문을 적어야만 다음 case문을 실행하지 않는다.
그래서 swift의 switch 문은 c 언어보다 더 간결하고 예측가능하고, case 문이 계속 실행되는 실수를 피할수 있다.
If you need C-style fallthrough behavior, you can opt in to this behavior on a case-by-case basis with the fallthrough keyword. The example below uses fallthrough to create a textual description of a number.
만약 c언어 스타일의 제어가 필요하다면 fallthrough 키워드를 사용하면 된다.
let integerToDescribe = 5
var description = "The number \(integerToDescribe) is"
switch integerToDescribe {
	case 2, 3, 5, 7, 11, 13, 17, 19:
		description += " a prime number, and also"
		fallthrough
	default:
		description += " an integer."
}
print(description)
// Prints "The number 5 is a prime number, and also an integer."
This example declares a new String variable called description and assigns it an initial value. The function then considers the value of integerToDescribe using a switchstatement. If the value of integerToDescribe is one of the prime numbers in the list, the function appends text to the end of description, to note that the number is prime. It then uses the fallthrough keyword to “fall into” the default case as well. The default case adds some extra text to the end of the description, and the switch statement is complete.
Unless the value of integerToDescribe is in the list of known prime numbers, it is not matched by the first switch case at all. Because there are no other specific cases, integerToDescribe is matched by the default case.
After the switch statement has finished executing, the number’s description is printed using the print(_:separator:terminator:) function. In this example, the number 5 is correctly identified as a prime number.
NOTE
The fallthrough keyword does not check the case conditions for the switch case that it causes execution to fall into. The fallthrough keyword simply causes code execution to move directly to the statements inside the next case (or default case) block, as in C’s standard switch statement behavior.
Labeled Statements
In Swift, you can nest loops and conditional statements inside other loops and conditional statements to create complex control flow structures. However, loops and conditional statements can both use the break statement to end their execution prematurely. Therefore, it is sometimes useful to be explicit about which loop or conditional statement you want a break statement to terminate. Similarly, if you have multiple nested loops, it can be useful to be explicit about which loop the continue statement should affect.
복잡한 경우에 조건문과 반복문을 다른 조건문이나 반복문안에 중첩해서 사용할수 있다.
조건문과 반복문 둘다 break를 사용해서 조기에 종료할수 있기 때문에
어떤 조건문 또는 반복문을 break 로 종료시킬지 명확히 지정하는게 필요할때가 있다.
마찬가지로 여러개의 반복문이 중첩되어 있을때 continue문을 사용시 어떤 반복문에 적용시킬지도 명확히 하는게 필요하다.
To achieve these aims, you can mark a loop statement or conditional statement with a statement label. With a conditional statement, you can use a statement label with the break statement to end the execution of the labeled statement. With a loop statement, you can use a statement label with the break or continue statement to end or continue the execution of the labeled statement.
이런 목표를 이루기 위해서, label 키워드를 이용해서 반복문 또는 조건문에 표시를 할수 있다.
조건문에서 label로 지정한 이름을 break 할때 넣으면, 이름이 지정된 조건문이 종료된다.
반복문에서 label로 지정한 이름을 break 할때 넣으면 그 반복문이 종료되고, continue할때 넣으면 그 반복문의 시작부분으로 이동한다.
A labeled statement is indicated by placing a label on the same line as the statement’s introducer keyword, followed by a colon. Here’s an example of this syntax for a while loop, although the principle is the same for all loops and switch statements:
label name: while condition {
	statements
}
The following example uses the break and continue statements with a labeled while loop for an adapted version of the Snakes and Ladders game that you saw earlier in this chapter. This time around, the game has an extra rule:
- To win, you must land exactly on square 25.
If a particular dice roll would take you beyond square 25, you must roll again until you roll the exact number needed to land on square 25.
The game board is the same as before.

The values of finalSquare, board, square, and diceRoll are initialized in the same way as before:
- let finalSquare = 25
- var board = [Int](repeating: 0, count: finalSquare + 1)
- board[03] = +08; board[06] = +11; board[09] = +09; board[10] = +02
- board[14] = -10; board[19] = -11; board[22] = -02; board[24] = -08
- var square = 0
- var diceRoll = 0
This version of the game uses a while loop and a switch statement to implement the game’s logic. The while loop has a statement label called gameLoop to indicate that it is the main game loop for the Snakes and Ladders game.
The while loop’s condition is while square != finalSquare, to reflect that you must land exactly on square 25.
gameLoop: while square != finalSquare {
	diceRoll += 1
	if diceRoll == 7 { diceRoll = 1 }
	switch square + diceRoll {
		case finalSquare:
			// diceRoll will move us to the final square, so the game is over
			break gameLoop
		case let newSquare where newSquare > finalSquare:
			// diceRoll will move us beyond the final square, so roll again
			continue gameLoop
		default:
			// this is a valid move, so find out its effect
			square += diceRoll
			square += board[square]
	}
}
print("Game over!")
The dice is rolled at the start of each loop. Rather than moving the player immediately, the loop uses a switch statement to consider the result of the move and to determine whether the move is allowed:
- If the dice roll will move the player onto the final square, the game is over. The break gameLoop statement transfers control to the first line of code outside of the while loop, which ends the game.
- If the dice roll will move the player beyond the final square, the move is invalid and the player needs to roll again. The continue gameLoop statement ends the current whileloop iteration and begins the next iteration of the loop.
- In all other cases, the dice roll is a valid move. The player moves forward by diceRollsquares, and the game logic checks for any snakes and ladders. The loop then ends, and control returns to the while condition to decide whether another turn is required.
NOTE
If the break statement above did not use the gameLoop label, it would break out of the switch statement, not the while statement. Using the gameLoop label makes it clear which control statement should be terminated.
It is not strictly necessary to use the gameLoop label when calling continue gameLoop to jump to the next iteration of the loop. There is only one loop in the game, and therefore no ambiguity as to which loop the continue statement will affect. However, there is no harm in using the gameLooplabel with the continue statement. Doing so is consistent with the label’s use alongside the breakstatement and helps make the game’s logic clearer to read and understand.
Early Exit
A guard statement, like an if statement, executes statements depending on the Boolean value of an expression. You use a guard statement to require that a condition must be true in order for the code after the guard statement to be executed. Unlike an if statement, a guard statement always has an else clause—the code inside the else clause is executed if the condition is not true.
guard문은 if문과 마찬가지로 조건의 참/거짓에 따라서 실행여부가 결정된다.
guard문을 사용해서 조건이 참일때만 guard 다음에 나오는 구문을 실행하도록 할수 있다.
if문과는 다르게 guard문은 항상 else 구문을 가지고 있다. else 구문은 조건이 참이 아닐때 실행된다.
func greet(person: [String: String]) {
	guard let name = person["name"] else {
		return
	}

	print("Hello \(name)!")

	guard let location = person["location"] else {
		print("I hope the weather is nice near you.")
		return
	}

	print("I hope the weather is nice in \(location).")
}

greet(person: ["name": "John"])
// Prints "Hello John!"
// Prints "I hope the weather is nice near you."
greet(person: ["name": "Jane", "location": "Cupertino"])
// Prints "Hello Jane!"
// Prints "I hope the weather is nice in Cupertino."
If the guard statement’s condition is met, code execution continues after the guard statement’s closing brace. Any variables or constants that were assigned values using an optional binding as part of the condition are available for the rest of the code block that the guard statement appears in.
guard문의 조건이 충족되면, guard의 닫기 brace (}) 다음 구문이 실행된다.
optional 로 값이 할당된 변수나 상수들은 guard문이 속해있는 블록안에서 사용할수 있다.
If that condition is not met, the code inside the else branch is executed. That branch must transfer control to exit the code block in which the guard statement appears. It can do this with a control transfer statement such as return, break, continue, or throw, or it can call a function or method that doesn’t return, such as fatalError(_:file:line:).
만약 조건이 충족되지 않으면, else 안의 구문들이 실행된다. else 안에서는 반드시 guard문이 속한 블록에서 빠져나가야 한다.
return, break, continue, throw를 사용할수 있고,
fatalError처럼 값을 리턴하지 않는 함수나 메소드를 사용할수도 있다.
Using a guard statement for requirements improves the readability of your code, compared to doing the same check with an if statement. It lets you write the code that’s typically executed without wrapping it in an else block, and it lets you keep the code that handles a violated requirement next to the requirement.
guard문을 사용하면 동일한 if문을 사용하는 것보다 코드의 가독성을 높일수 있다.
그 다음 문장들은 무슨 뜻인지 모르겠다...
그리고 guard도 쓰임새를 잘 이해 못하겠다...
나중에 알게 되겠지...
Checking API Availability
Swift has built-in support for checking API availability, which ensures that you don’t accidentally use APIs that are unavailable on a given deployment target.
swift는 API 가용성 검사를 내장하고 있다. 배포 타겟에서 사용할수 없는 API를 사용하는 실수를 막아준다.
The compiler uses availability information in the SDK to verify that all of the APIs used in your code are available on the deployment target specified by your project. Swift reports an error at compile time if you try to use an API that isn’t available.
너의 코드에서 사용된 모든 API들이, 너의 프로젝트가 명시한 배포 타겟에서 사용가능한지 검증하려고,
컴파일러는 SDK안의 가용성 정보를 사용할수 있다.
swift는 사용불가능한 API를 사용했을때 컴파일 에러를 발생시킨다.
You use an availability condition in an if or guard statement to conditionally execute a block of code, depending on whether the APIs you want to use are available at runtime. The compiler uses the information from the availability condition when it verifies that the APIs in that block of code are available.
너가 사용하려는 API가 실행시에 사용가능한지 여부에 따라 다른 코드 블록을 실행시킬수 있다 (if 또는 guard 문으로)
if #available(iOS 10, macOS 10.12, *) {
	// Use iOS 10 APIs on iOS, and use macOS 10.12 APIs on macOS
} else {
	// Fall back to earlier iOS and macOS APIs
}
The availability condition above specifies that in iOS, the body of the if statement executes only in iOS 10 and later; in macOS, only in macOS 10.12 and later. The last argument, *, is required and specifies that on any other platform, the body of the if executes on the minimum deployment target specified by your target.
위의 가용성 조건은 iOS 10 이상, macOS 10.12 일때만 if문이 실행되도록 한다.
마지막 매개변수 * 는 필수이며 다른 플랫폼에서 실행될 배포 타켁의 최소값을 지정한다.
In its general form, the availability condition takes a list of platform names and versions. You use platform names such as iOS, macOS, watchOS, and tvOS—for the full list, see Declaration Attributes. In addition to specifying major version numbers like iOS 8 or macOS 10.10, you can specify minor versions numbers like iOS 11.2.6 and macOS 10.13.3.
- if #available(platform name version, ..., *) {
- statements to execute if the APIs are available
- } else {
- fallback statements to execute if the APIs are unavailable
- }
'iOS 초보' 카테고리의 다른 글
| [swift5.1번역] 7.Closures (0) | 2019.07.25 |
|---|---|
| [swift5.1번역] 6.Functions (0) | 2019.07.09 |
| [swift5.1번역] 4.Collection Types (0) | 2019.07.01 |
| [swift5.1번역] 3.Strings and Characters (0) | 2019.06.27 |
| [swift5.1번역] 2.Basic Operators (0) | 2019.06.21 |


